⚡ Rocket.net – Managed WordPress Hosting

MiltonMarketing.com  Powered by Rocket.net – Managed WordPress Hosting

Bernard Aybouts - Blog - MiltonMarketing.com

Approx. read time: 17.8 min.

Post: WordPress PayPal Donation Shortcode: Easy Buttons & Plugins

Create a PayPal Donation Shortcode – WordPress: If you are using the PayPal Donate function to accept donations from your website’s visitors, you can use this code snippet to create a shortcode, and thus make donating easier.

To add a PayPal donation button to your WordPress website, you can follow these steps:

  1. Log In to PayPal: Start by logging into your PayPal account.
  2. Create the Button: Navigate to the ‘PayPal buttons’ section. Select ‘Create new button’. Choose ‘Donations’ and customize your button.
  3. Copy the Code: Once the button is customized, PayPal generates HTML code. Copy this code.
  4. Access Your WordPress Site: Log in to your WordPress dashboard.
  5. Add the Button: Go to the page or post where you want the button. Paste the HTML code into an HTML block or a widget area.
  6. Save and Test: Save your changes and preview the page to ensure the button works correctly.

This method integrates the donation button directly, allowing visitors to donate without leaving your site. Below is a more indepth tutorial.


Why a PayPal Donation Button

There are a lot of WordPress plugins that can help you collect and manage donations, but often these are overkill. Sometimes all you want to do is add a simple donation button to your site. With this approach, you can add it to any text or widget area across your WordPress site.

Users can click this button and make a donation via PayPal using their balance or credit card. Since PayPal is a well-known processor, your visitors will know your link is secure.

PayPal Donation Fees

Before we continue, there are some processing fees you’ll want to be aware of.

There is no cost for placing a donation button on your site. But, to process the transaction, PayPal will charge $.30 plus 2.9% of the total transaction. Your contributor won’t be charged, as this percentage will come out of the donation amount.

With that out of the way, it’s time to show you how to add a PayPal donation button to your site.

How to Add a PayPal Donate Button to WordPress

There are two ways to add a PayPal donate button to a WordPress site:

  1. Generating a button on PayPal’s website and embedding it into your site.
  2. Using a plugin to connect to your PayPal account and embed a button with a WordPress shortcode, or a widget.

Both approaches will lead to the same result, so it’s up to you which route you’d like to take.

Creating a Donation Button via PayPal

With this method, you’ll create a button on the PayPal site and copy and paste the generated code into your website. Here’s how you do it:

1. Sign up for a PayPal Account

If you don’t have a PayPal account, then you’ll need to create one first. Navigate to the PayPal site and click on ‘Get Started Today’.

Creating a PayPal account to get a donation button.

Decide whether you need a personal or business account and fill out the required fields.

With your account set up, you can create your very own donation button.

2. Generate Your Donation Button

With your account created, navigate to the PayPal Fundraising page, and click on the link that says ‘Learn about creating a donation button’.

Setting up a donate button on PayPal.

Then, click on the link that says ‘Create a button’.
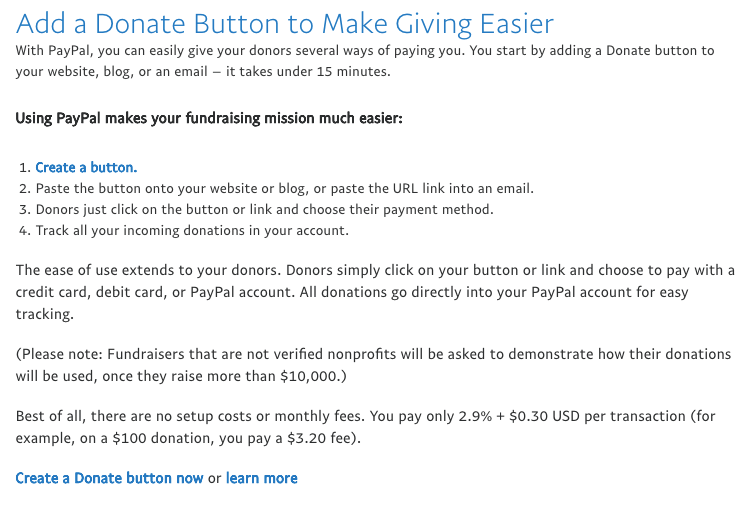
PayPal donate button description.
WordPress PayPal Donation Shortcode: Easy Buttons & Plugins 25

On the next screen, you can start creating your button. From the drop-down box, select the ‘Donations’ option.
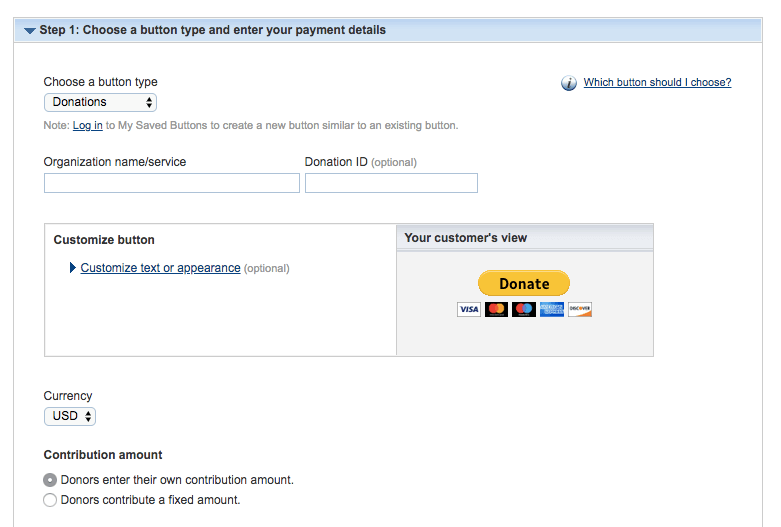
PayPal donate button options.

Enter the name of your organization, then click on ‘Customize text or appearance’. The stock button looks pretty good, but you can customize it to fit your site if you wish.

Your next decision is choosing whether you want donors to contribute a fixed amount or whatever amount they wish.
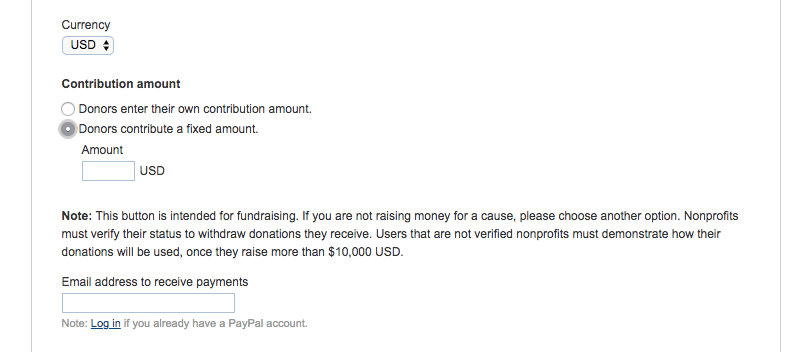
Setting a fixed donation amount and currency.

Finally, select whether you want to use your primary email address or use a secure merchant account ID. The merchant account option will keep your email address hidden.

Now, click on Step 2, and check the box that says ‘Save button at PayPal’. This will save the button for later use and keep you safe from fraudulent charges.

Step 3 is optional, but there are some features you might want to enable like:

  • Let your customer add a special message or thank you note for your work.
  • Allow donors to include their shipping details if you’d like to send them a physical gift.
  • Specify a redirect URL to send them to once they’ve completed the donation.

With all those steps complete select ‘Create Button’ at the bottom of the page.

3. Add the Button Code to Your Site

With your donation button created you’ll now have the code that you’ll need to copy and paste into your site.

Retrieving PayPal donate button code.

Click on ’Select Code’, then copy the code.

Now open up your WordPress dashboard and paste that code into any area of your site where you’d like the button to appear.

For this example we’re going to paste the code into a separate donation page:
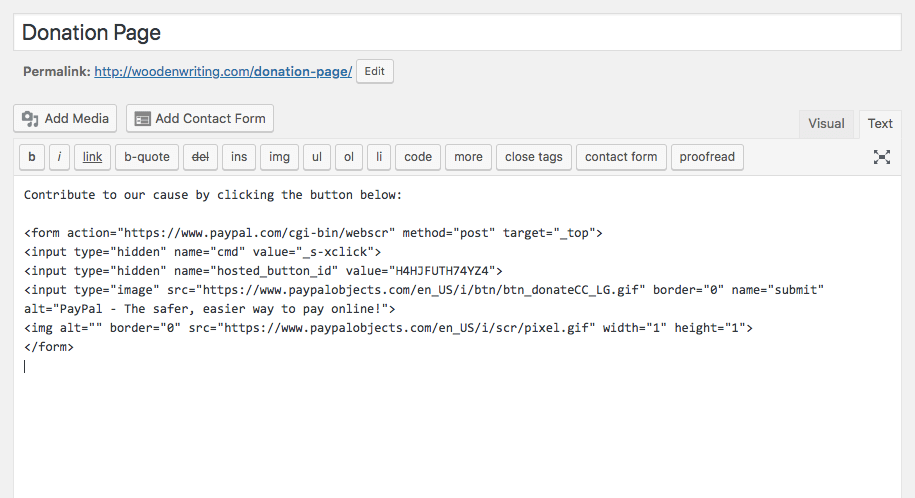
Adding a PayPal donate button to a WordPress post.

You can also paste the code into any section of your website, such as a page, post, or widget area.

Add a Donation Button With a WordPress Plugin

If you don’t want to deal with code and prefer to use a plugin, then this method is for you. Here’s how you add a donation button to your site with a plugin:

1. Download the PayPal Donations Plugin

There are a lot of PayPal donation plugins you can use. But one of the easiest to utilize is the PayPal Donations plugin.

PayPal donate button plugin for WordPress.

This plugin currently has a 5-star review, with over 50,000 installations, so you know it’s trustworthy and high-quality.

To install this plugin navigate to Plugins › Add New, and type ‘PayPal Donations’ into the search bar. Look for the plugin that’s shown in the picture below:
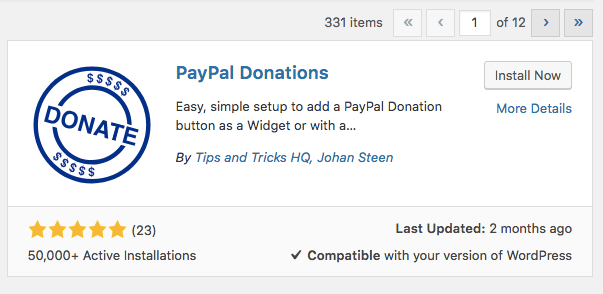
paypal donations plugin.

Click ‘Install Now’, and then ‘Activate’ once the button switches over.

2. Setup the Plugin

To set up the plugin, navigate to Settings › PayPal Donations from within your WordPress dashboard.
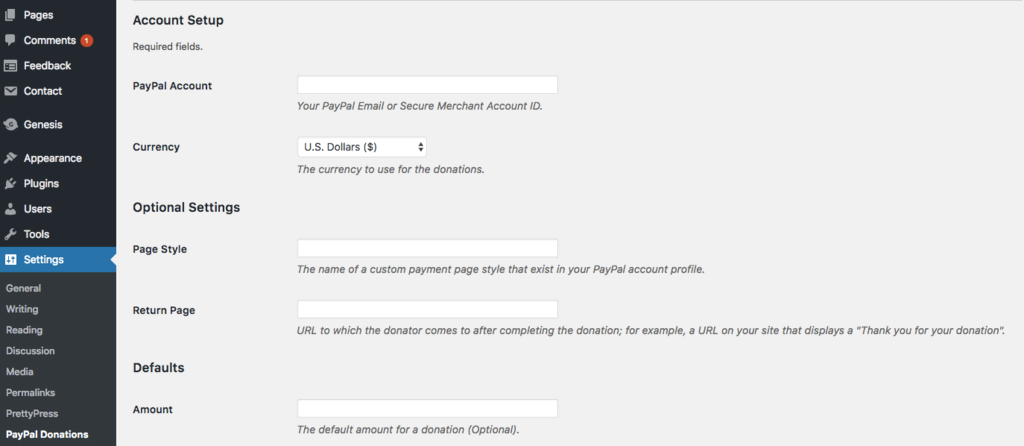
Configuring PayPal donate button in WordPress dashboard.

Enter your account email address into the PayPal Account field. Technically, this is the only field you need to enter to continue. But you can also change things like the currency, the page style, and the return page.

Changing the return page gives you the ability to send donors to another page once they’ve finished the transaction.

In the Defaults section, you can let your visitors know the purpose of the donation or specify the amount people usually contribute.
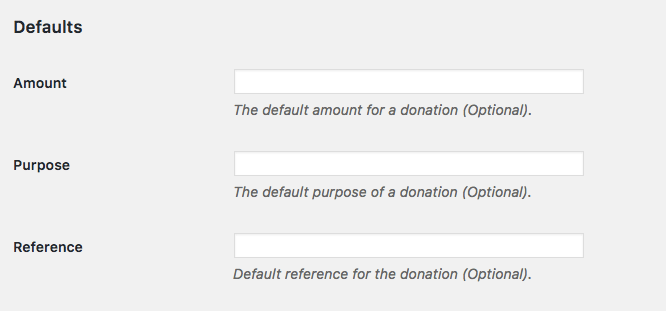
Additional settings for PayPal donate button.

Finally, you can choose how you want the donation button to display, or you can enter the URL of a custom button.

3. Add It to Your Site via Widget

The first way to add the donation button to your site is via a widget.

To do this,  navigate to Appearance › Widgets. On the left-hand side, you’ll notice the PayPal Donations widget.

Drag this into the section of your site where you’d like the widget to appear. This could be your footer, header, sidebar, or any other widget area across your site.
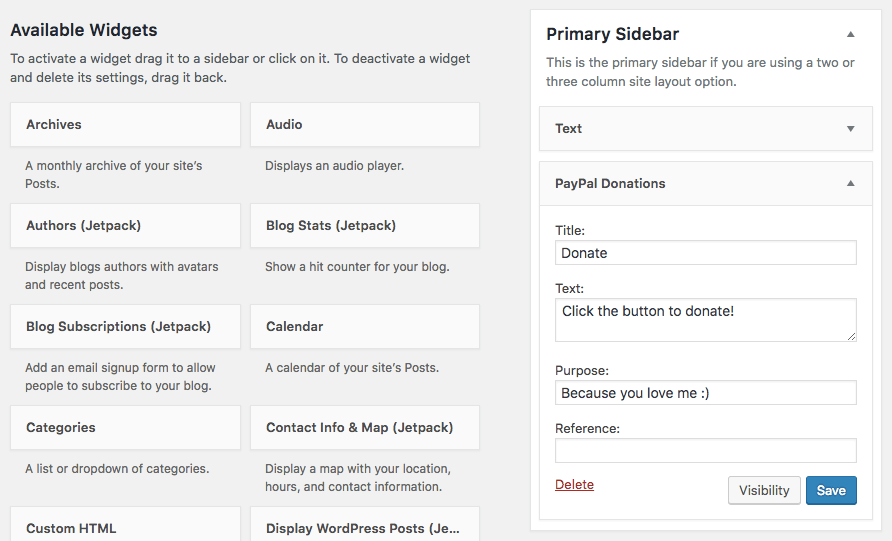
Adding PayPal donate button as a widget in WordPress.

Customizing the widget is easy. Just add a title, text, purpose, and reference. Feel free to leave any of the fields blank if you only want a PayPal button to appear.

4. Add It to Your Site via Shortcode

The second method of adding a PayPal donation button is with a shortcode. Simply copy and paste this shortcode [paypal-donation] into a text field. Here’s what it would look like on a separate donation page:
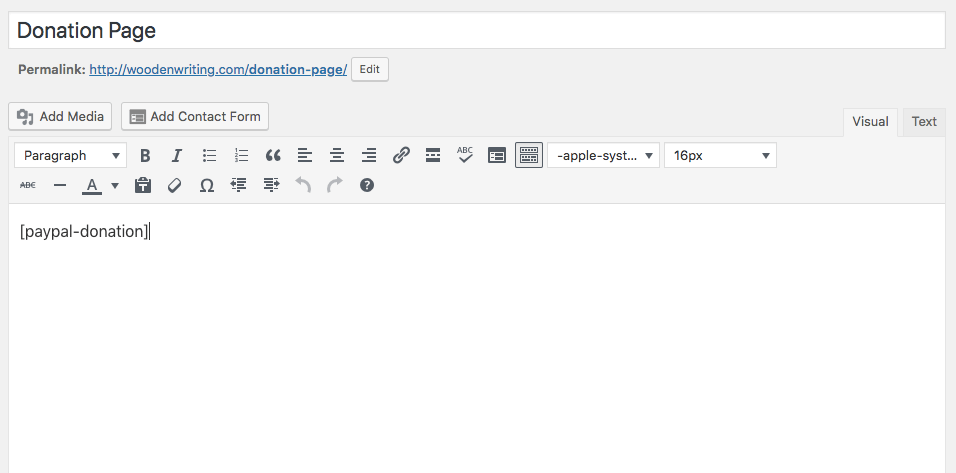
Adding PayPal donate button via shortcode in WordPress.

You can even add the shortcode to a plain text widget if you want the donation button to appear without any additional text.

To do this, create a text widget and copy your shortcode into the text field, and click ‘Save‘.

Bernard Aybouts - Blog - MiltonMarketing.com
WordPress PayPal Donation Shortcode: Easy Buttons & Plugins 26

Conclusion

Now you know how to add a PayPal donation button to your WordPress site. No matter which approach you take, your site is now ready to receive donations from your loyal readers.

Before we leave, here are a few final bits of advice:

  1. Adding an explanation to the ‘why’ behind your donation button can help to encourage donations.
  2. Customizing the appearance of your button can help you integrate it with your site’s existing design.
  3. Consider adding a redirect page after users donate to either thank them or offer a free gift.

If you’re trying to maximize donations to your site, consider experimenting with the elements above. Otherwise, you’re all set, and your site is equipped to handle donations.

Still have questions about the best way to integrate PayPal donations with your WordPress site? Please share in the comments below.


Functions.php can be used by both classic themes, block themes, and child themes.

The functions.php file is where you add unique features to your WordPress theme. It can be used to hook into the core functions of WordPress to make your theme more modular, extensible, and functional.

What is functions.php?

The functions.php file behaves like a WordPress plugin, adding features and functionality to a WordPress site. You can use it to call WordPress functions and to define your own functions.

Note:The same result can be produced using either a plugin or functions.php. If you are creating new features that should be available no matter what the website looks like, it is best practice to put them in a plugin.

There are advantages and tradeoffs to either using a WordPress plugin or using functions.php.

A WordPress plugin:

  • requires specific, unique header text;
  • is stored in wp-content/plugins, usually in a subdirectory;
  • only executes on page load when activated;
  • applies to all themes; and
  • should have a single purpose – for example, offer search engine optimization features or help with backups.

Meanwhile, a functions.php file:

  • requires no unique header text;
  • is stored in theme’s subdirectory in wp-content/themes;
  • executes only when in the active theme’s directory;
  • applies only to that theme (if the theme is changed, the features can no longer be used); and
  • can have numerous blocks of code used for many different purposes.

Each theme has its own functions file, but only code in the active theme’s functions.php is actually run. If your theme already has a functions file, you can add code to it. If not, you can create a plain-text file named functions.php to add to your theme’s directory, as explained below.

child theme can have its own functions.php file. Adding a function to the child functions file is a risk-free way to modify a parent theme. That way, when the parent theme is updated, you don’t have to worry about your newly added function disappearing.

Note:Although the child theme’s functions.php is loaded by WordPress right before the parent theme’s functions.php, it does not override it. The child theme’s functions.php can be used to augment or replace the parent theme’s functions. Similarly, functions.php is loaded after any plugin files have loaded.

With functions.php you can:

  • Use WordPress hooks. For example, with the excerpt_length filter you can change your post excerpt length (from default of 55 words).
  • Enable WordPress features with add_theme_support(). For example, turn on post thumbnails, post formats, and navigation menus.
  • Define functions you wish to reuse in multiple theme template files.

Warning:In WordPress, naming conflicts can occur when two or more functions, classes, or variables have the same name. This can cause errors or unexpected behavior in a WordPress site. It is the responsibility of both the theme developer and plugin developer to avoid naming conflicts in their respective code.

Theme developers should ensure that their functions, classes, and variables have unique names that do not conflict with those used by WordPress core or other plugins. They should also prefix their function and class names with a unique identifier, such as the theme name or abbreviation, to minimize the chances of a naming conflict.

Top ↑

Examples

Below are a number of examples that you can use in your functions.php file to support various features. Each of these examples are allowed in your theme if you choose to submit it to the WordPress.org theme directory.

Top ↑

Theme Setup

A number of theme features should be included within a “setup” function that runs initially when your theme is activated. As shown below, each of these features can be added to your functions.php file to activate recommended WordPress features.

Note:It’s important to namespace your functions with your theme name. All examples below use myfirsttheme_ as their namespace, which should be customized based on your theme name.

To create this initial function, start a new function entitled myfirsttheme_setup(), like so:

if ( ! function_exists( 'myfirsttheme_setup' ) ) :
/**
 * Sets up theme defaults and registers support for various WordPress  
 * features.
 *
 * It is important to set up these functions before the init hook so
 * that none of these features are lost.
 *
 *  @since MyFirstTheme 1.0
 */
function myfirsttheme_setup() 

Note: In the above example, the function myfirsttheme_setup is started but not closed out. Be sure to close out your functions.

Top ↑

Automatic feed links enables post and comment RSS feeds by default. These feeds will be displayed in  automatically. They can be called using add_theme_support() in classic themes. This feature is automatically enabled for block themes, and does not need to be included during theme setup.

add_theme_support( 'automatic-feed-links' );

Top ↑

In classic themes, custom navigation menus allow users to edit and customize menus in the Menus admin panel, giving users a drag-and-drop interface to edit the various menus in their theme.

You can set up multiple menus in functions.php. They can be added using register_nav_menus() and inserted into a theme using wp_nav_menu(), as discussed later in this handbook. If your theme will allow more than one menu, you should use an array. While some themes will not have custom navigation menus, it is recommended that you allow this feature for easy customization.

register_nav_menus( array(
    'primary'   => __( 'Primary Menu', 'myfirsttheme' ),
    'secondary' => __( 'Secondary Menu', 'myfirsttheme' )
) );

Each of the menus you define can be called later using wp_nav_menu() and using the name assigned (i.e. primary) as the theme_location parameter.

In block themes, you use the navigation block instead.

Top ↑

Load Text Domain

Themes can be translated into multiple languages by making the strings in your theme available for translation. To do so, you must use load_theme_textdomain(). For more information on making your theme available for translation, read the internationalization section.

load_theme_textdomain( 'myfirsttheme', get_template_directory() . '/languages' );

Top ↑

Post Thumbnails

Post thumbnails and featured images allow your users to choose an image to represent their post. Your theme can decide how to display them, depending on its design. For example, you may choose to display a post thumbnail with each post in an archive view. Or, you may want to use a large featured image on your homepage. This feature is automatically enabled for block themes, and does not need to be included during theme setup.

add_theme_support( 'post-thumbnails' );

Top ↑

Post Formats

Post formats allow users to format their posts in different ways. This is useful for allowing bloggers to choose different formats and templates based on the content of the post. add_theme_support() is also used for Post Formats. This is recommended.

add_theme_support( 'post-formats',  array( 'aside', 'gallery', 'quote', 'image', 'video' ) );

Learn more about post formats.

Top ↑

Theme support in block themes

In block themes, the following theme supports are enabled automatically:

add_theme_support( 'post-thumbnails' );
add_theme_support( 'responsive-embeds' );
add_theme_support( 'editor-styles' );
add_theme_support( 'html5', array( 'style','script' ) );
add_theme_support( 'automatic-feed-links' ); 

Top ↑

Initial Setup Example

Including all of the above features will give you a functions.php file like the one below. Code comments have been added for future clarity.

As shown at the bottom of this example, you must add the required add_action() statement to ensure the myfirsttheme_setup function is loaded.

if ( ! function_exists( 'myfirsttheme_setup' ) ) :
	/**
	 * Sets up theme defaults and registers support for various
	 * WordPress features.
	 *
	 * Note that this function is hooked into the after_setup_theme
	 * hook, which runs before the init hook. The init hook is too late
	 * for some features, such as indicating support post thumbnails.
	 */
	function myfirsttheme_setup() {

    /**
	 * Make theme available for translation.
	 * Translations can be placed in the /languages/ directory.
	 */
		load_theme_textdomain( 'myfirsttheme', get_template_directory() . '/languages' );

		/**
		 * Add default posts and comments RSS feed links to.
		 */
		add_theme_support( 'automatic-feed-links' );

		/**
		 * Enable support for post thumbnails and featured images.
		 */
		add_theme_support( 'post-thumbnails' );

		/**
		 * Add support for two custom navigation menus.
		 */
		register_nav_menus( array(
			'primary'   => __( 'Primary Menu', 'myfirsttheme' ),
			'secondary' => __( 'Secondary Menu', 'myfirsttheme' ),
		) );

		/**
		 * Enable support for the following post formats:
		 * aside, gallery, quote, image, and video
		 */
		add_theme_support( 'post-formats', array( 'aside', 'gallery', 'quote', 'image', 'video' ) );
	}
endif; // myfirsttheme_setup
add_action( 'after_setup_theme', 'myfirsttheme_setup' );

Top ↑

Content Width

In classic themes, a content width is added to your functions.php file to ensure that no content or assets break the container of the site. The content width sets the maximum allowed width for any content added to your site, including uploaded images. In the example below, the content area has a maximum width of 800 pixels. No content will be larger than that.

if ( ! isset ( $content_width) ) {
    $content_width = 800;
}

Themes that include a theme.json configuration file does not need to include the variable in functions.php. Instead, the content width is added to the layout setting in theme.json. You can learn more about using theme.json in the advanced section.

Top ↑

Other Features

There are other common features you can include in functions.php. Listed below are some of the most common features. Click through and learn more about each of these features.

  • Custom Headers -Classic themes
  • Sidebars (widget areas) -Classic themes
  • Custom Background -Classic themes
  • Title tag -Classic themes
  • Add Editor Styles
  • HTML5 -Classic themes

Top ↑

Your functions.php File

If you choose to include all the functions listed above, this is what your functions.php might look like. It has been commented with references to above.

/**
 * MyFirstTheme's functions and definitions
 *
 * @package MyFirstTheme
 * @since MyFirstTheme 1.0
 */

/**
 * First, let's set the maximum content width based on the theme's
 * design and stylesheet.
 * This will limit the width of all uploaded images and embeds.
 */
if ( ! isset( $content_width ) ) {
	$content_width = 800; /* pixels */
}


if ( ! function_exists( 'myfirsttheme_setup' ) ) :

	/**
	 * Sets up theme defaults and registers support for various
	 * WordPress features.
	 *
	 * Note that this function is hooked into the after_setup_theme
	 * hook, which runs before the init hook. The init hook is too late
	 * for some features, such as indicating support post thumbnails.
	 */
	function myfirsttheme_setup() {

		/**
		 * Make theme available for translation.
		 * Translations can be placed in the /languages/ directory.
		 */
		load_theme_textdomain( 'myfirsttheme', get_template_directory() . '/languages' );

		/**
		 * Add default posts and comments RSS feed links to.
		 */
		add_theme_support( 'automatic-feed-links' );

		/**
		 * Enable support for post thumbnails and featured images.
		 */
		add_theme_support( 'post-thumbnails' );

		/**
		 * Add support for two custom navigation menus.
		 */
		register_nav_menus( array(
			'primary'   => __( 'Primary Menu', 'myfirsttheme' ),
			'secondary' => __( 'Secondary Menu', 'myfirsttheme' ),
		) );

		/**
		 * Enable support for the following post formats:
		 * aside, gallery, quote, image, and video
		 */
		add_theme_support( 'post-formats', array( 'aside', 'gallery', 'quote', 'image', 'video' ) );
	}
endif; // myfirsttheme_setup
add_action( 'after_setup_theme', 'myfirsttheme_setup' );

About the Author: Bernard Aybout (Virii8)

Avatar of Bernard Aybout (Virii8)
I am a dedicated technology enthusiast with over 45 years of life experience, passionate about computers, AI, emerging technologies, and their real-world impact. As the founder of my personal blog, MiltonMarketing.com, I explore how AI, health tech, engineering, finance, and other advanced fields leverage innovation—not as a replacement for human expertise, but as a tool to enhance it. My focus is on bridging the gap between cutting-edge technology and practical applications, ensuring ethical, responsible, and transformative use across industries. MiltonMarketing.com is more than just a tech blog—it's a growing platform for expert insights. We welcome qualified writers and industry professionals from IT, AI, healthcare, engineering, HVAC, automotive, finance, and beyond to contribute their knowledge. If you have expertise to share in how AI and technology shape industries while complementing human skills, join us in driving meaningful conversations about the future of innovation. 🚀