Approx. read time: 6.8 min.
Post: How Do You Troubleshoot a Faulty Compressor?
Troubleshooting a compressor involves a systematic approach to identify the root cause of the issue. Based on my experience in the HVAC industry in both commercial and residential settings, I’ve developed a reliable method to address compressor problems. This guide applies to all compressors, whether in HVAC AC units, refrigerators, or technically anything with a compressor. By following these steps, you can often eliminate the need for costly estimates and service call fees, potentially saving hundreds of dollars. Below is a step-by-step guide to troubleshoot a compressor:
Safety first: Turn off the power leading to your air conditioning unit. It’s important that your power is off so that you don’t shock yourself when checking the compressor. Many central air units will have a power shutoff switch on the wall next to the unit. Find the switch and switch it to the off position.
- If there is no switch, find the circuit breaker that controls the power to the area of the house where the AC unit is. Flip the circuit to the off position to turn off the power.
- You can unplug the AC to shut down the power if it’s a window unit.
Remove cover, and dont forget to turn on power after testing.
1. Check Power Supply
- Verify Voltage: Ensure the proper voltage is reaching the compressor terminals. Use a multimeter to check that the voltage is within the manufacturer’s recommended range.
- Check Fuses and Breakers: Inspect the circuit breakers and fuses for blown fuses or tripped breakers. Reset or replace as necessary.
- Inspect Wiring Connections: Make sure all wiring connections are secure, without any loose or burnt wires.
2. Check Capacitor
- Test the Capacitor: If the compressor isn’t starting or is hard-starting, the capacitor may be bad. Use a multimeter with capacitance mode to test it. If it’s not within the specified range, replace the capacitor.
3. Inspect Compressor Overload Protector
- Check Overload Protector: The overload may be tripped due to overheating. Let the compressor cool down and reset the overload protector if it has tripped.
- Test with a Multimeter: You can check the continuity of the overload protector using a multimeter. If there’s no continuity, it’s likely faulty.
4. Check Refrigerant Levels 1
- Low Refrigerant: If the compressor is running but not cooling properly, check for low refrigerant levels. Low refrigerant can cause the compressor to short cycle or not function efficiently.
- Signs of Refrigerant Leak: Look for signs of oil stains around fittings or connections, indicating a possible refrigerant leak.
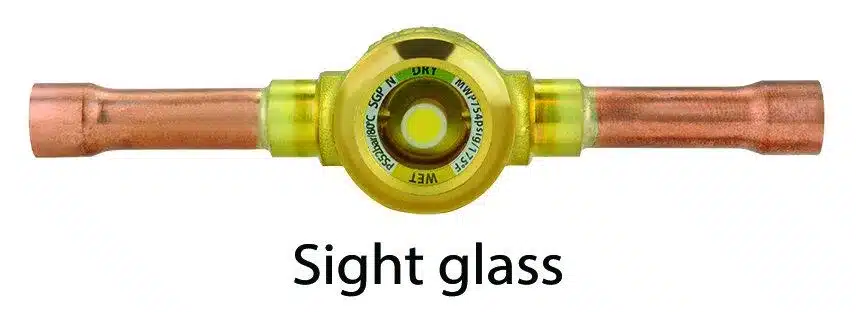
- Two methods for checking refrigerant levels. With a high/low side gauge (for pros) or a site glass. If the site glass is bubbling your system needs refrigerant.
With a high/low side gauge (for pros)
Can You Check the Refrigerant Charge of an AC Unit by only Measuring Pressures? Explained! –
With a high/low side gauge (for pros)
How to Check AC Freon Level
5. Check for Contactor Issues
- Inspect the Contactor: Check if the contactor is closing properly. The contacts could be burnt or stuck, preventing power from reaching the compressor. If it’s faulty, replace it.
- Test the Contactor Coil: Check for continuity across the coil. If the coil has failed, it will not energize the contactor.
6. Measure Compressor Windings (Resistance Test)
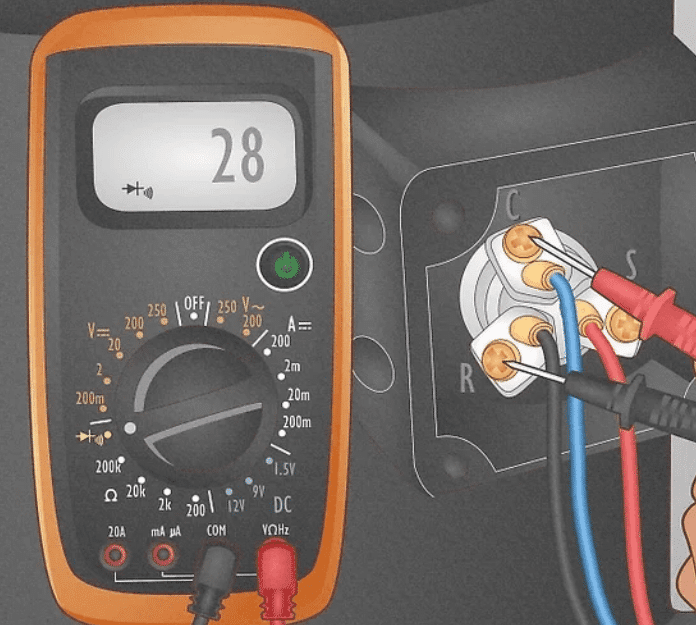
- Test the Windings: Use a multimeter to test the resistance across the compressor terminals (C, R, S):
- These letters stand for common, run, and start.
- C to R (Run)
- C to S (Start)
- R to S (This should equal the sum of C to R and C to S)
- A winding that’s open or shorted will indicate a bad compressor motor.
- Check for Grounding: Test for continuity between each terminal and the ground. If there’s continuity, the compressor is grounded and should be replaced.
Place the red pin on C and the black pin on S. Place the pins on the black and red wire from your multimeter onto the terminals. Once you place the pins on the terminals, your multimeter should have an ohm reading of less than 30. Anything significantly above this reading indicates that your compressor may be broken.

Place The Red Pin On C And The Black Pin On S. Place The Pins On The Black And Red Wire From Your Multimeter Onto The Terminals. Once You Place The Pins On The Terminals, Your Multimeter Should Have An Ohm Reading Of Less Than 30. Anything Significantly Above This Reading Indicates That Your Compressor May Be Broken.
Place the red pin on C and the black pin on R. Repeat the process, this time checking the continuity between the common and run terminals. Again, the continuity should read under 30.

Place The Red Pin On C And The Black Pin On R. Repeat The Process, This Time Checking The Continuity Between The Common And Run Terminals. Again, The Continuity Should Read Under 30.
Put the red pin on R and the black pin on S. The final test is between the run and start terminals.The continuity between these terminals should be under 30.

Put The Red Pin On R And The Black Pin On S. The Final Test Is Between The Run And Start Terminals.the Continuity Between These Terminals Should Be Under 30.
7. Check for Mechanical Issues
- Locked Rotor: If the compressor hums but doesn’t start, it could be experiencing a locked rotor. This can be due to mechanical failure or an electrical issue.
- Seized Compressor: If the compressor is seized, it will need to be replaced.
8. Test for Pressure Issues
- High-Pressure Switch: If the high-pressure switch is tripped, it could indicate a problem with airflow, overcharging, or a blockage in the system.
- Low-Pressure Switch: A low-pressure switch trip might suggest a refrigerant leak or low refrigerant charge.
9. Inspect for Overheating
- Thermal Overload: Compressors may shut off due to overheating. Check the suction and discharge pressures and ensure proper cooling (check the condenser coil for dirt/debris).
If the compressor runs but the unit is not cooling, and there is sufficient refrigerant (gas) then the issue might be your dirty condenser coil. Some crooked technicians will come to your home or business and just air clean or even wash your units and claim they filled refrigerant and charge you over $400.
10. Listen for Abnormal Noises
- Humming or Buzzing: These noises may indicate electrical issues like a bad capacitor or contactor.
- Loud Clanking or Knocking: Mechanical damage inside the compressor (such as worn bearings) can produce these noises.
11. Evaluate Run Time and Cycling
- Short Cycling: If the compressor starts and stops frequently, check the thermostat, refrigerant levels, and airflow. This could also be due to improper load matching.
12. Check for Overload Tripping
- Compressor Tripping: If the compressor trips on overload repeatedly, ensure it’s not drawing excessive amperage. Compare the measured amperage to the rated load amperage (RLA).
13. Check Oil Levels (for Semi-Hermetic Compressors)
- Oil Starvation: In systems with semi-hermetic compressors, ensure proper oil levels. Low oil levels can cause significant damage to the compressor.
If you follow these steps and the compressor continues to malfunction, it may be time to consider a replacement. Or contact our special sponsor:
Aire One K.W. Heating & Cooling
Call now: (866) 438-2710
4.9 Stars from (8,630 votes.)
24+ years in business
Serves Milton
Related Videos:
Related Posts:
How Can You Troubleshoot Your Refrigerator Like an HVAC Technician?
The Most Memorable Vacation: Jamaica 2011
Comprehensive Guide to Troubleshooting Bluetooth Connectivity Issues in Windows
How to open and use the Terminal app on a Mac computer, with a few basic commands
Ai Pin: Transforming Everyday Life with Innovative Wearable Technology
How to download and install Alice
Troubleshooting and Support FAQs
The Priceless Tap: A Lesson in Valuing Expertise and Experience


