
⚡ MiltonMarketing.com Powered by Rocket.net – Managed WordPress Hosting


Approx. read time: 14.6 min.
Post: Raspberry Pi 5 Build Guide: The Ultimate Setup with NVMe, OLED Case, and DAC Sound Card
Introduction
Welcome to my Raspberry Pi 5 build guide. The Raspberry Pi 5 is the most powerful model yet, featuring a quad-core Cortex-A76 CPU clocked at 2.4GHz and up to 16GB LPDDR4X RAM. It's fast enough to be a desktop replacement, a home server, or even an audiophile music streamer.
In this guide, I'll walk through the exact parts I purchased, how I assembled them, and what I learned. The setup includes:
-
A 16GB Raspberry Pi 5 kit with case, dual-fan cooler, and OLED display.
-
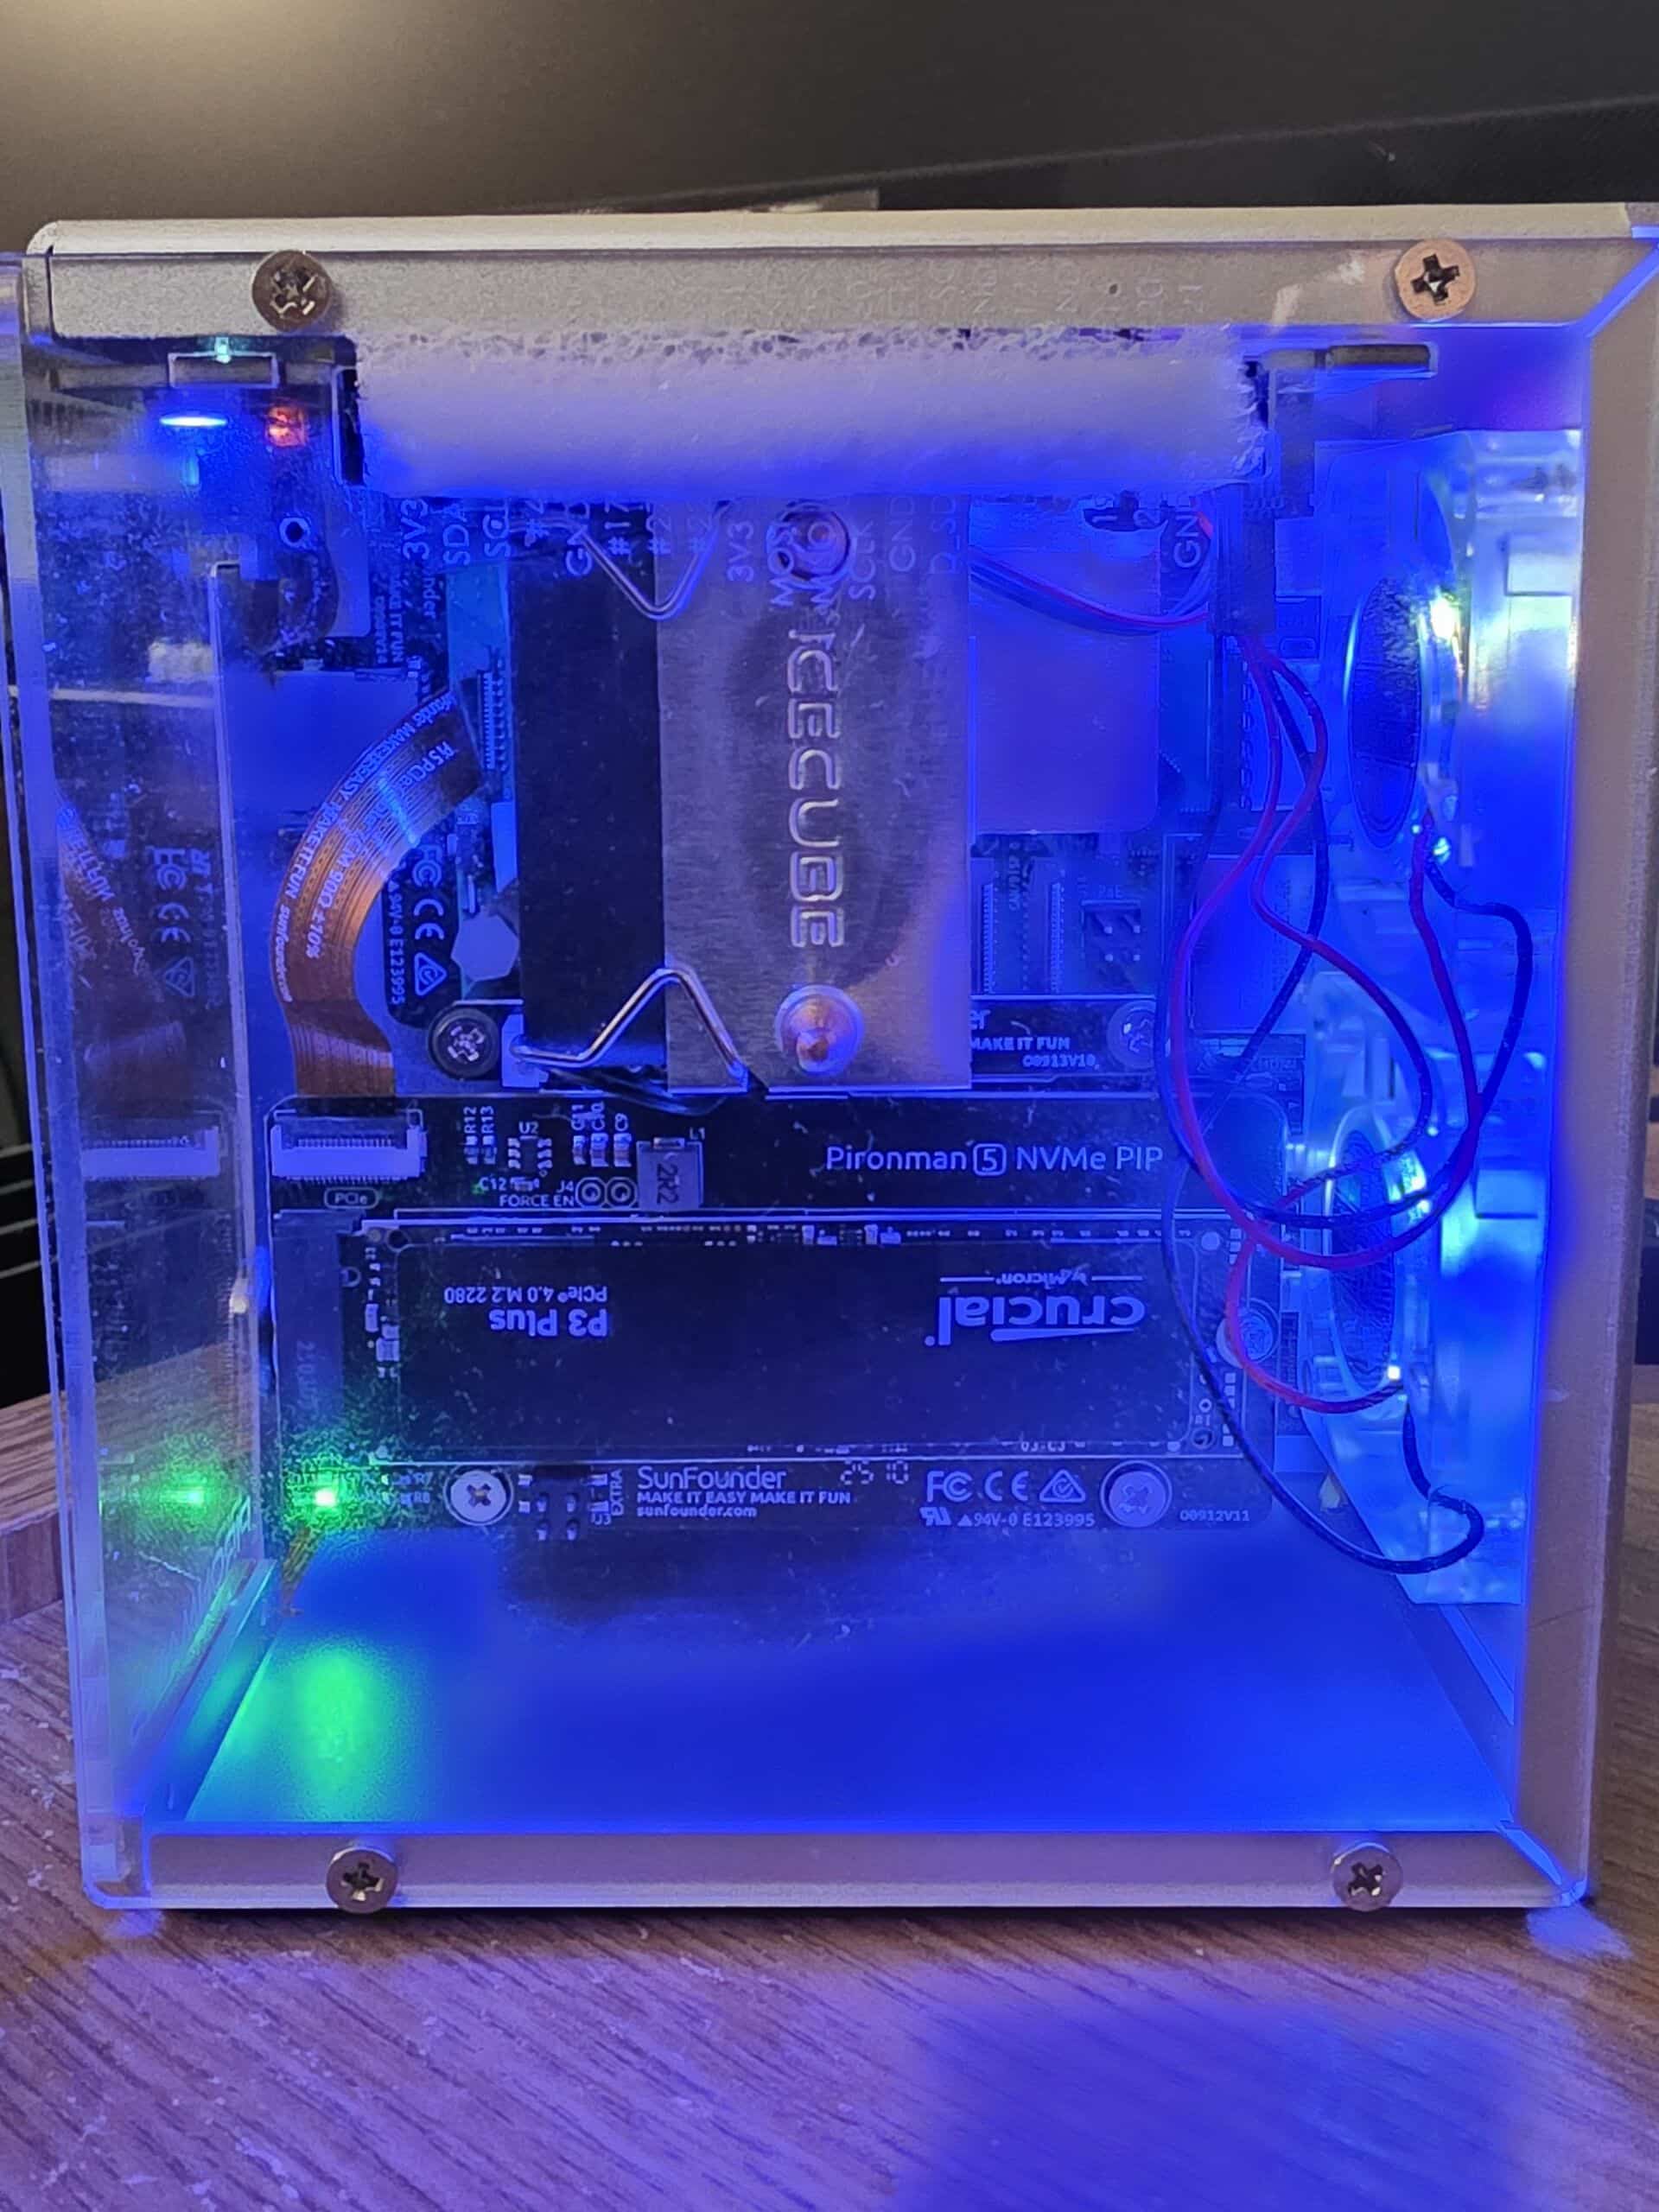
A 1TB Crucial P3 NVMe SSD using the official NVMe HAT+.
-
An Innomaker ES9038Q2M DAC HAT for high-fidelity sound.
-
Solutions for cooling, GPIO conflicts, and display freezes.
By the end, you'll see how to transform the Pi 5 into a complete workstation and music system.
Core Kit: iRasptek Raspberry Pi 5 Bundle – Raspberry Pi 5 NVMe SSD setup
The foundation of my build was the iRasptek PI5CA16G-256GB Kit. It included everything I needed to get started:
-
256GB microSD card with Raspberry Pi OS (Bookworm 64-bit) pre-installed.
-
27W USB-C PD Power Supply (5V/5A) — critical for stable operation.
-
Active Cooler HAT with dual PWM fans and a small OLED screen.
-
Aluminum metal case with transparent top.
-
2× 4K HDMI cables, USB card reader, and a GPIO reference card.
This kit made the Pi truly "plug and play." Just insert the card, connect HDMI, power up, and it boots straight to the desktop.
Raspberry Pi 5 Build Guide: Adding NVMe SSD Storage – Raspberry Pi 5 NVMe SSD setup
One of the biggest upgrades in this Raspberry Pi 5 build guide is NVMe storage. The Pi 5 exposes a single PCIe lane, allowing direct SSD support.
Why NVMe SSD?
-
Speed: Boots in seconds, much faster than microSD.
-
Endurance: NVMe drives last longer under heavy write cycles.
-
Capacity: Up to terabytes of fast, reliable storage.
My NVMe Setup
I added a Crucial P3 1TB NVMe SSD using the official NVMe HAT+ and flat flex cable.
Steps I followed:
-
Booted from the included SD card.
-
Used Raspberry Pi Imager to flash Raspberry Pi OS directly to the SSD.
-
Updated firmware with:
-
Set NVMe first as boot order in
raspi-config.
Now the Pi boots from NVMe, with the SD card reserved as a backup. Performance jumped dramatically【turn0search14†source】.
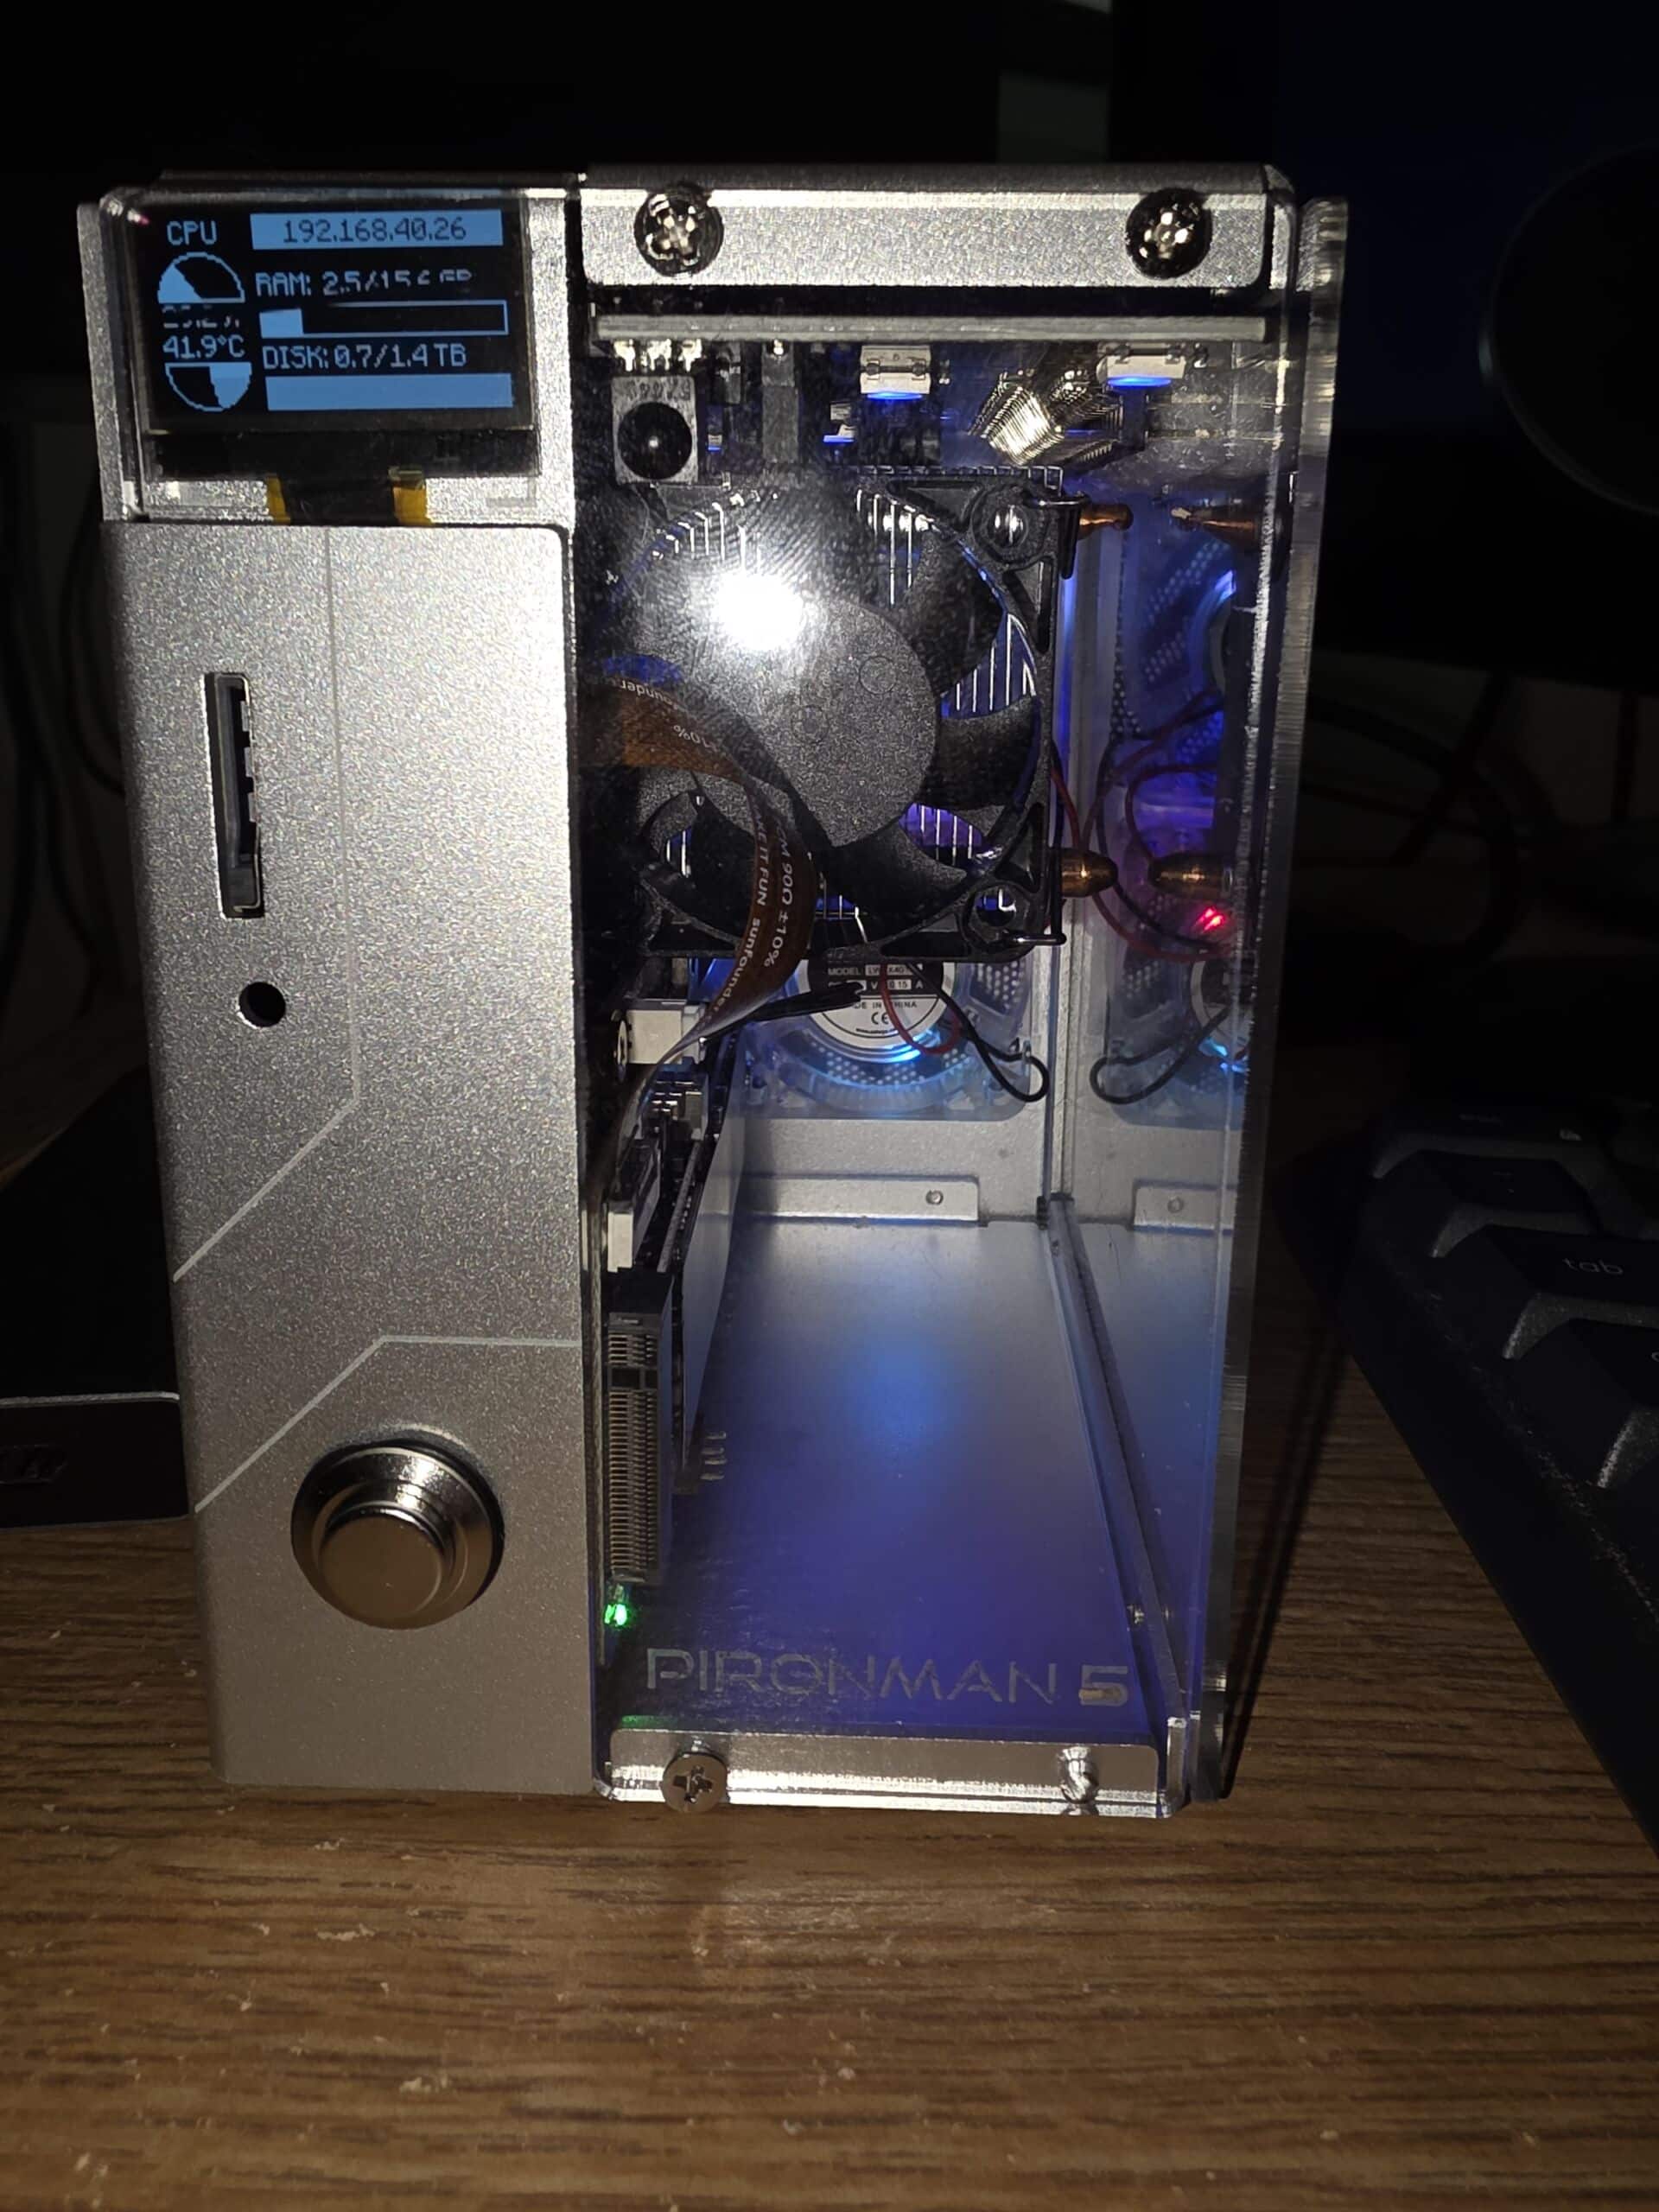
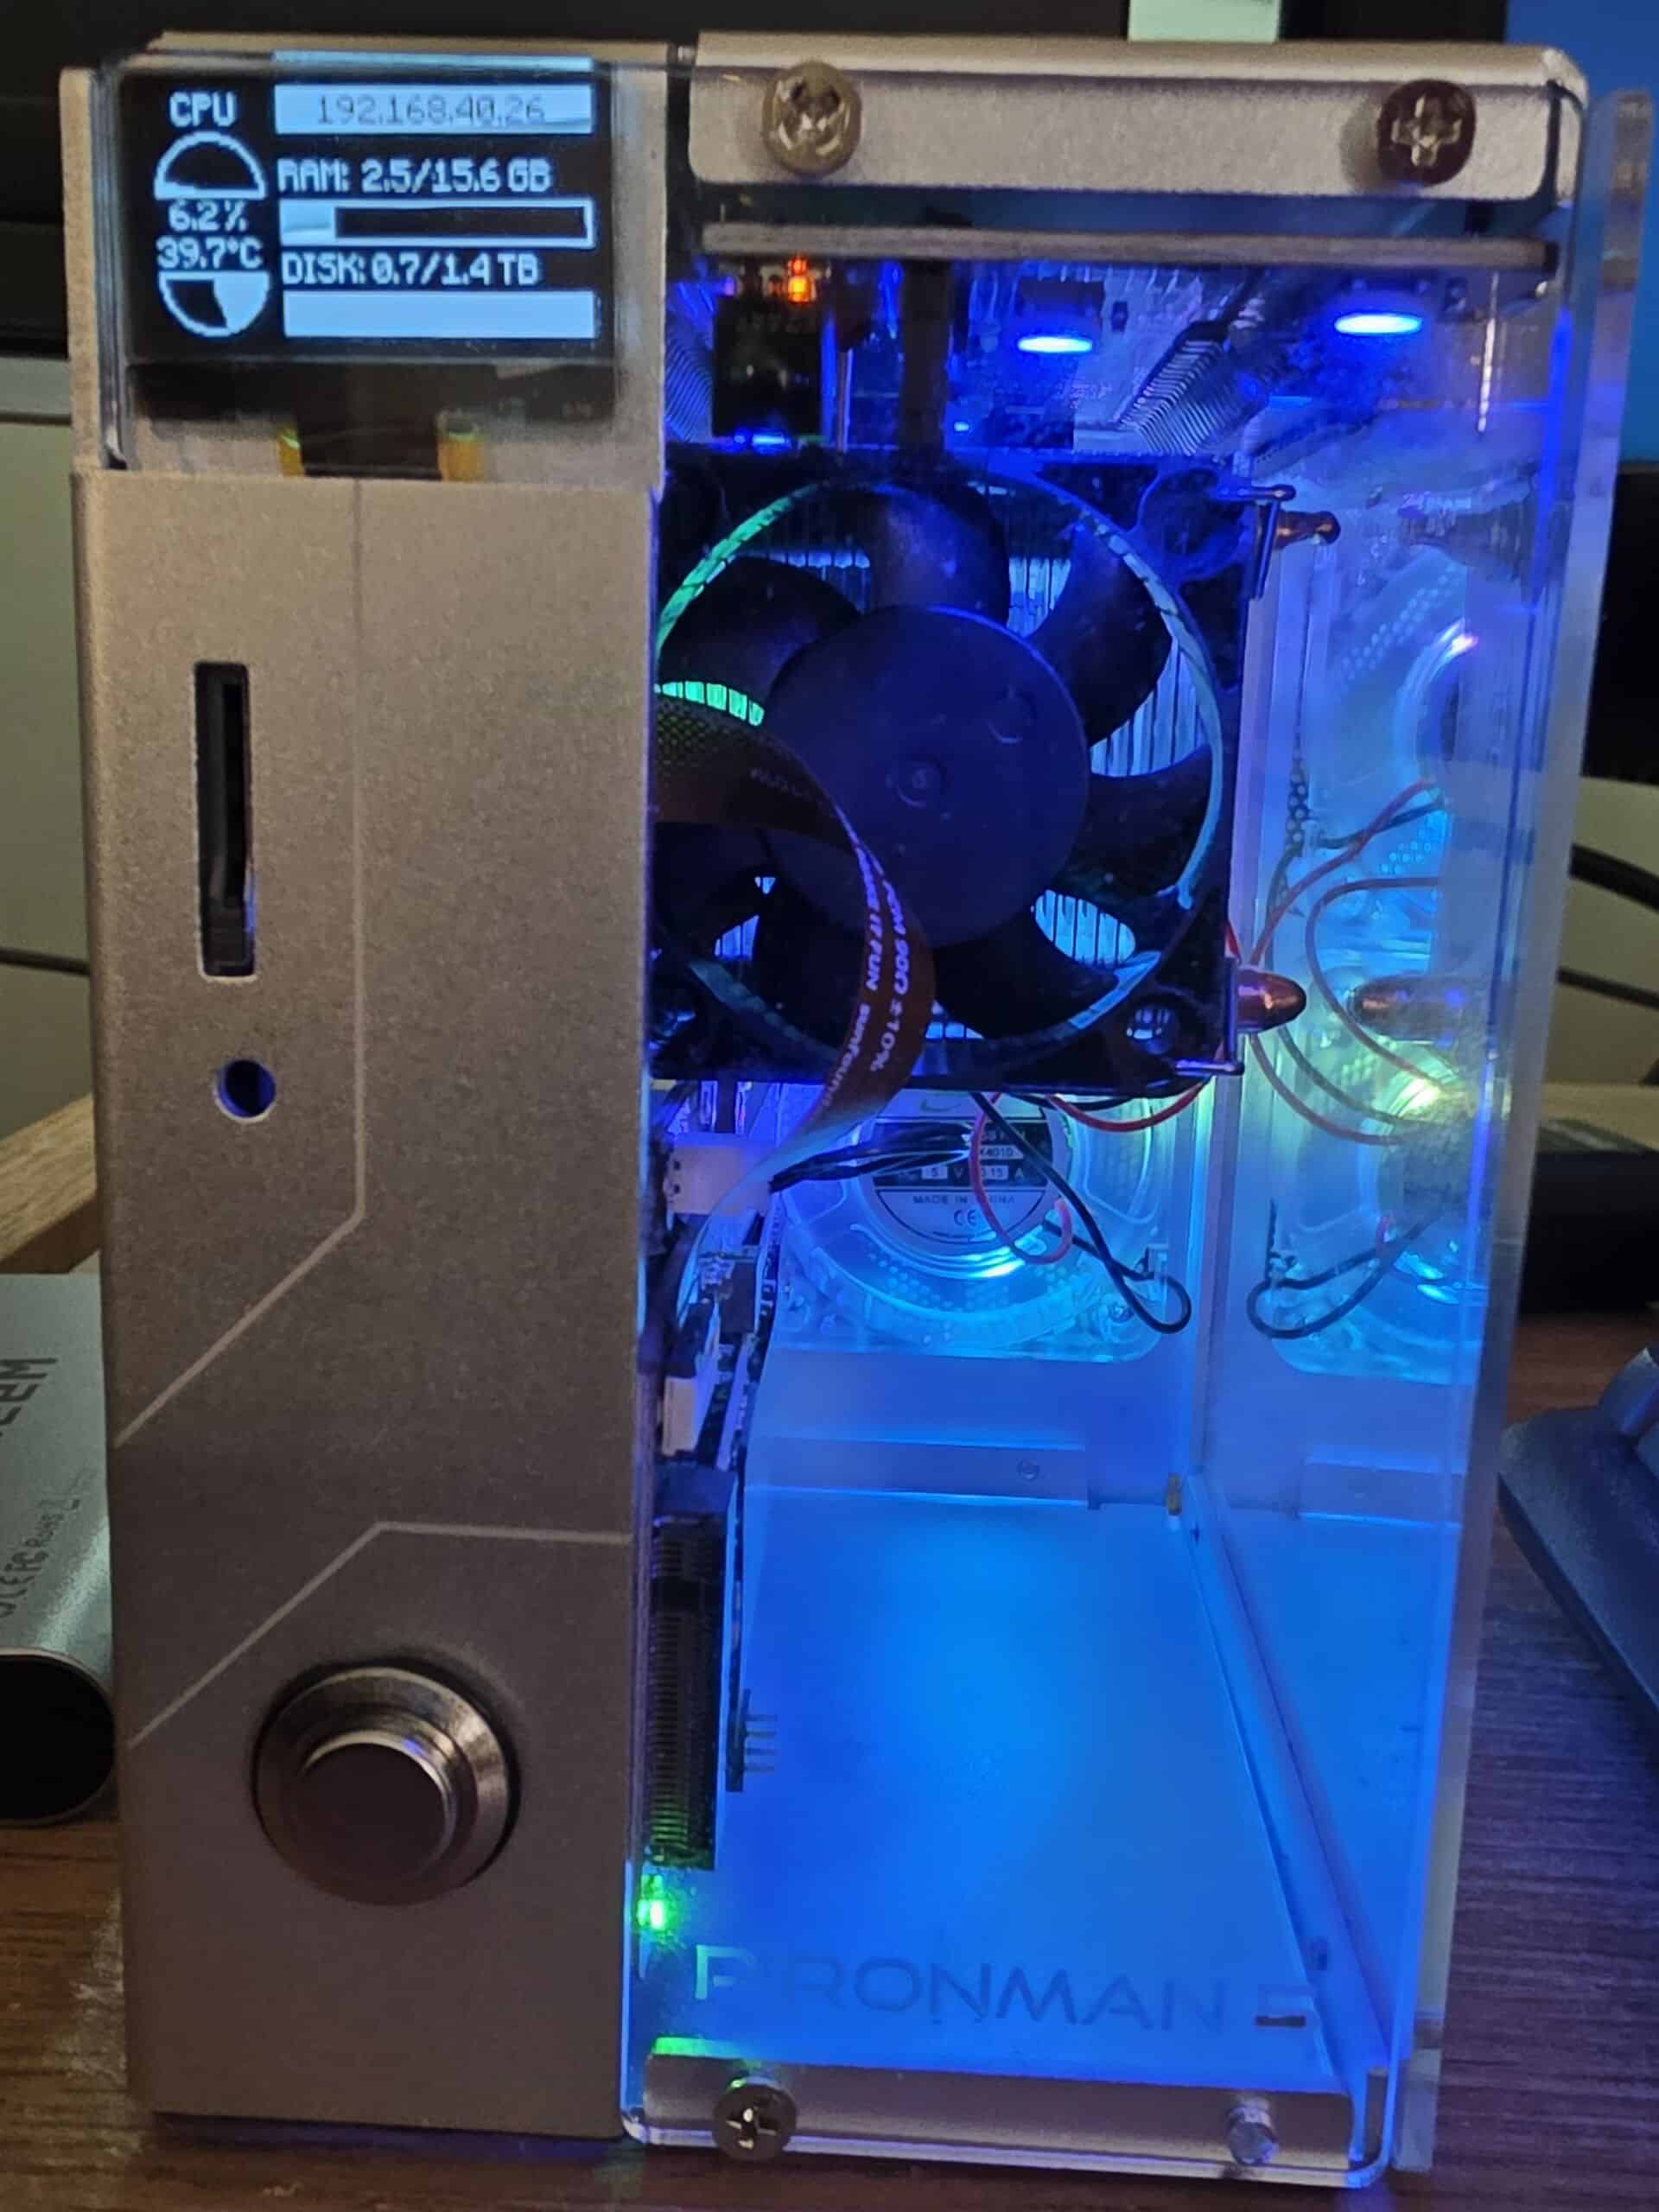
Raspberry Pi 5 Build Guide: Cooling and OLED Screen – Raspberry Pi 5 case with OLED cooler
The Pi 5 runs hotter than earlier models. The iRasptek Active Cooler HAT helps by adding:
-
Dual 30mm PWM fans.
-
Aluminum heatsink plate.
-
Small OLED display for system status.
Enabling the OLED – Raspberry Pi 5 case with OLED cooler
When I first powered up, the OLED stayed blank. Here's how I fixed it:
-
Enable I²C:
Interface Options → I²C → Enable → Reboot【turn0search6†source】.
-
Check the bus:
The OLED appeared at
0x3C【turn0search7†source】. -
Install the display service:
I used the vendor's GitHub repo (linked on the card in the kit). Typical setup: -
Recover if it freezes:
-
Confirm with
i2cdetect -y 1. -
Restart the service:
-
Once running, the OLED displayed CPU temp and fan duty cycle in real time.
What does the OLED screen display? and how can we modify it?
Raspberry Pi 5 case with OLED cooler: Short version, it's a tiny status display for your cooler HAT. By default these show:
-
CPU temperature (°C)
-
Fan duty / RPM (e.g., 45% or 3200 RPM)
-
CPU frequency (e.g., 600 MHz → 2400 MHz)
-
System uptime (hh:mm:ss)
-
Sometimes CPU load, memory use, 5V voltage/undervolt flag, and your IP address
Exactly what you see depends on the vendor's Python/service script that's driving the OLED.
How to see/change what it shows
-
Find the service/script name
-
Open the script/config (common locations):
-
/usr/local/bin/-oled.py -
/opt//oled/ -
A unit file in
/etc/systemd/system/pointing to the script path
-
-
Edit the layout/order/metrics
Open the script in a text editor, look for lines that read sensors (e.g.,vcgencmd measure_temp,/sys/class/thermal/,psutil), then print to the display. You can reorder or add fields (IP, RAM, etc.).
Quick add-ons you can display
-
IP address
-
CPU load & RAM
-
Undervolt/thermal flags
If the OLED ever goes blank
-
Make sure I²C is enabled and the screen is detected:
-
Restart the service:
If you paste the service path (or the script's contents), I can tailor the display to show exactly what you want (e.g., line 1: temp/fan, line 2: load/RAM, line 3: IP/uptime).
Raspberry Pi 5 Build Guide: Audiophile DAC Sound Card
To take audio performance further, I added the Innomaker ES9038Q2M DAC HAT.
Why this DAC?
-
ESS Sabre ES9038Q2M chip.
-
32-bit / 384kHz PCM & DSD512 support.
-
129dB dynamic range, -120dB THD+N.
-
Balanced output + headphone jack.
Installation Steps
-
Removed the fan HAT (GPIO conflicts).
-
Attached passive heatsinks and a USB fan to keep temps low.
-
Edited boot config:
Added:
-
Rebooted and confirmed detection:
Result: the DAC appeared as a sound device, and audio playback was crystal-clear【turn0search4†source】.
Case & Assembly Adjustments
The aluminum case kept the Pi safe and compact, but fitting both the DAC and cooler wasn't possible.
My solution:
-
Removed the fan HAT.
-
Used passive heatsinks for SoC and PMIC.
-
Mounted a side-blowing USB fan.
-
Left NVMe HAT inside the case.
This balanced thermals (45–55°C) with room for the DAC.
Raspberry Pi 5 Build Guide: Troubleshooting Lessons
-
Resolution freeze: Changing display resolution in Plasma caused halts. Solution: boot with
hdmi_safe=1【turn0search22†source】, then reset to 1080p. -
GPIO conflicts: The fan HAT uses GPIO18 for PWM — the same pin I²S DACs need. Couldn't stack them reliably.
-
Power: Only the 27W PSU kept the Pi stable. Cheaper adapters led to
vcgencmd get_throttledundervoltage warnings.
Final Raspberry Pi 5 Build Recap
Here's my completed system:
-
Raspberry Pi 5 (16GB RAM, Cortex-A76)
-
1TB Crucial P3 NVMe SSD (boot drive)
-
Innomaker ES9038Q2M DAC HAT
-
Aluminum case with passive heatsinks + USB 5V fan
-
27W official PSU
-
256GB microSD card (backup OS)
-
OLED screen functional when fan HAT is attached
Performance Impressions
-
Boot speed: 3 seconds to login.
-
Audio quality: Clean, spacious, near-studio level.
-
Thermals: Stable at ~50°C under load.
-
Desktop experience: LXDE is snappy; KDE Plasma works but is heavier.
Different usage scenarios for your Raspberry PI – Raspberry Pi 5 build guide
1) Home Automation (the “killer app”)
Turn a Raspberry Pi into the brain of your smart home—local, fast, and private.
Key patterns & examples:
-
Home Assistant Hub: Run Home Assistant OS or Docker on a Pi. Pair with a Zigbee (e.g., Sonoff/ZBDongle-E) or Z-Wave USB stick to control lights, switches, sensors, blinds, and locks—locally and without cloud lock-in.
-
Example flows: "When the front door opens after sunset, turn on foyer lights to 40% and start a warm jazz playlist."
-
-
Node-RED Automations: Visually wire logic like "if motion in hallway + luminance < 40 lux → turn on stair LEDs for 3 minutes."
-
MQTT Broker (Mosquitto): Standard glue for sensors and devices. Publish sensor readings (temp, humidity, door state) and subscribe from Home Assistant.
-
Presence & Geofencing: Detect who's home via phone pings/BLE beacons; trigger "Away Mode" to arm cameras and lower thermostat.
-
Energy Monitoring: Read smart plugs or a CT clamp (e.g., Shelly EM) → Home Assistant dashboards for real-time usage and daily kWh costs.
-
Voice & Dash Buttons: Add offline voice (Rhasspy/ESPHome Voice) or small e-paper buttons that trigger scenes (e.g., "Movie Night," "Goodnight").
-
Security & Cameras: Pair with Frigate NVR on the Pi for object detection (people, cars) and Home Assistant alerts with snapshots.
-
Access Control: Integrate smart locks; auto-lock at bedtime, notify if left unlocked, create guest codes with time windows.
-
Automations that impress non-techies:
-
Morning: lights fade up + weather + traffic on display.
-
Laundry: washer smart plug power drops → "Laundry done" announcement.
-
Mailbox: reed switch triggers "Mail delivered" with a photo.
-
Why a Pi for this? Low power draw, runs 24/7, fully local (privacy), enormous ecosystem, and survives internet outages.
2) Media Center (Kodi, IPTV & Streaming Servers)
A Raspberry Pi can transform into a living-room powerhouse that rivals expensive streaming boxes. With the right setup, it can play local media, handle IPTV, record live TV, and even serve as your household's private Netflix.
Kodi Media Center
Kodi is the gold standard for DIY media centers, and it runs beautifully on a Raspberry Pi.
-
Interface & Skins: The default Estuary skin is clean and user-friendly, but you can choose from hundreds of custom skins that mimic Netflix, Plex, or futuristic UIs.
-
Media Libraries: Point Kodi at your local storage, SMB/NFS shares, or NAS devices, and it will scrape metadata like cover art, episode guides, and cast info automatically.
-
Audio & Video Quality: With the Pi 4 and Pi 5 supporting HDMI 2.0, you can output 4K video at 60fps and pass through Dolby/DTS audio to your receiver for a theater-like experience.
-
Add-ons & Plugins: Extend Kodi with weather dashboards, song lyrics, subtitles, and integrations for services like YouTube, SoundCloud, and more.
Why this matters: Instead of juggling different streaming sticks or relying on ad-filled TV interfaces, Kodi centralizes everything into one consistent, customizable platform.
IPTV & Personal Video Recorder (PVR)
If you still enjoy live TV channels or sports, a Raspberry Pi can handle that too.
-
TVHeadend Backend: Install TVHeadend on the Pi, connect a USB DVB-T/S tuner or IPTV source, and you have a powerful backend server.
-
Kodi Frontend: Pair TVHeadend with Kodi for a seamless frontend experience—browse the electronic program guide (EPG), schedule recordings, pause live TV, and time-shift broadcasts.
-
Storage Options: Save recordings directly to your Pi's SSD, or stream them to a NAS for centralized storage.
Example use case: Record a late-night Formula 1 race while you sleep and watch it in the morning, skipping commercials with Kodi's playback controls.
Streaming Server (Plex & Jellyfin)
For households with multiple devices, turning your Pi into a streaming server is game-changing.
-
Plex: Polished, easy to set up, with remote access and mobile apps. Great for families who want streaming outside the home.
-
Jellyfin: 100% open-source and free, with no premium subscriptions. Excellent for privacy-conscious users.
-
Features: Both support transcoding (depending on CPU/GPU power), metadata scraping, multiple user profiles, parental controls, and subtitle downloads.
-
Devices: Stream content to smart TVs, Fire Sticks, Android/iOS devices, or even web browsers.
Why it's powerful: Your Raspberry Pi becomes your own private Netflix server—tailored to your library, with no licensing limits or disappearing shows.
Bonus Expansions
-
Spotify & Music Playback: Install add-ons like Spotify Connect or use the Pi as an AirPlay target, turning your Hi-Fi system into a smart speaker.
-
Retro Gaming Integration: With builds like LibreELEC + RetroArch, you can flip between watching movies and emulating retro games on the same box.
-
Home Theater Control: Integrate Kodi with Home Assistant, so starting a movie dims the lights, lowers blinds, and switches your AV receiver to the right input.
👉 Bottom line: With Kodi, TVHeadend, Plex, or Jellyfin, a Raspberry Pi is more than a streaming stick—it's a do-everything media hub that puts you in full control of your living-room experience.
3) Personal Cloud & File Server (NAS-lite)
Run Samba/SMB for shared folders, Nextcloud for a private Dropbox replacement, rsync/Restic for backups, and Syncthing for device-to-device sync. Add a USB 3.0 SSD for speed.
4) Ad-Blocking DNS (Pi-hole / AdGuard Home)
A Pi as your network's DNS sinkhole: remove ads and trackers on every device (smart TVs, consoles, phones) and speed up browsing.
5) VPN Gateway (WireGuard/OpenVPN)
Host a WireGuard server on your Pi to reach your home network securely from anywhere, stream your Jellyfin library, and access Home Assistant remotely without exposing ports.
6) Retro Gaming Console
Install RetroPie or Batocera to emulate NES, SNES, Genesis, PS1/PSP. Add a wireless controller and an attractive frontend like EmulationStation.
7) 3D Printing Control (OctoPrint)
Use OctoPrint to manage prints, monitor via webcam, run OctoLapse for time-lapses, queue jobs, and add plugins for filament run-out and bed-mesh visualizations.
8) Network Monitoring & Speed Tests
-
Grafana + Prometheus/InfluxDB to graph latency, packet loss, and bandwidth.
-
LibreSpeed or scheduled
iperf3tests to track your ISP performance over time.
9) Ethical Hacking / Blue-Team Lab (White Hat)
Build a safe, isolated lab:
-
Kali Linux on Pi for network mapping, password audits (legal scope!), and Wi-Fi assessments on your own gear.
-
Honeypots (Cowrie, T-Pot) to study attacker behavior and harden your home network.
-
Blue-team practice: Suricata/Zeek on mirrored traffic for detection rules and alert tuning.
⚠️ Always get explicit permission and keep this on your own networks. This is for learning and defense, not abuse.
10) Web Server & Development Sandbox
Run Nginx/Apache, PHP, MariaDB, Node.js, and Docker Compose to prototype apps, stage WordPress sites, or practice CI/CD.
11) Lightweight Kubernetes (k3s) & Containers
Cluster a couple of Pis with k3s to learn modern deployment patterns. Great for HA Home Assistant, MQTT, Ingress, and GitOps experiments.
12) Robotics & IoT Controller
Use the Pi's GPIO and I²C/SPI/UART to control motors and read sensors. Pair with ESPHome or MicroPython nodes for cheap, distributed devices reporting to the Pi via MQTT.
13) AI at the Edge
-
TensorFlow Lite on the Pi for on-device image and sound classification.
-
Add a Coral USB TPU to accelerate object detection (people, pets, vehicles) for Frigate or custom models—all local.
14) Surveillance & Smart Doorbell
Pair inexpensive RTSP IP cameras with Frigate NVR on the Pi. Get "person detected at driveway" alerts with snapshots in <1s, no cloud subscription.
15) Time-Lapse & Photography Rig
Automate DSLR/USB camera triggers, interval capture, and focus stacking. Use gPhoto2 and a Pi Zero for ultra-portable field kits.
16) Weather Station & Environmental Sensing
Read BME280/DS18B20 sensors for temperature/humidity/pressure, publish to MQTT, and build Grafana dashboards. Add rain and wind for a full station.
17) Print Server (CUPS) & Scanner Hub
Share a USB printer across your network with CUPS, and add SANE for network scanning—handy for older but reliable printers.
18) Travel Router & Captive Portal Bypass
Turn a Pi + USB Wi-Fi into a tiny travel router, creating your own WPA2 network in hotels. Add Pi-hole to keep streaming devices clean from ads on the road.
19) Classroom & Learning Station
Perfect for STEM: teach Python, Linux, Git, and electronics. Prepare SD cards with prebuilt lessons (GPIO blinking, logging data to CSV, plotting with Matplotlib).
20) Business Dashboards & Signage
-
Kiosk mode Chromium to display KPIs, queue dashboards, or schedules on a wall-mounted screen.
-
Cycle through tabs and auto-recover after power loss.
21) Specialty Gateways (Matter/Thread/Zigbee)
Use the Pi as a Matter/Thread Border Router (with supported radios) or a universal Zigbee coordinator to unify ecosystems (Philips Hue, Aqara, IKEA, Tuya) under one local brain.
Picking the Right Pi (quick guidance)
-
Pi 5: Best all-rounder; snappy for Home Assistant + Frigate (light), Jellyfin, Docker stacks.
-
Pi 4 (4–8GB): Great for Kodi, Pi-hole, Nextcloud, OctoPrint.
-
Pi Zero 2 W: Perfect for single-purpose nodes (sensors, travel router, small kiosks).
Storage: Prefer USB 3.0 SSD/NVMe over microSD for reliability.
Power: Use an official PSU; unstable power causes weird crashes.
Cooling: Passive is fine for light tasks; active cooling for Pi 5 or sustained loads.
Legal & Security Notes (for readers)
-
Only scan or test networks you own or have written permission to assess.
-
Keep services behind a VPN or reverse proxy with SSO/2FA.
-
Maintain updates (
apt, Docker images), and back up configs (e.g., Home Assistant snapshots, Docker volumes).
Conclusion – Raspberry Pi 5 build guide
This Raspberry Pi 5 build guide demonstrates how to push the Pi to its full potential by combining NVMe SSD storage for speed, an OLED-equipped case with active cooling for stability, and an audiophile-grade DAC for pristine sound. The result is a compact system that functions as both a responsive desktop and a Hi-Fi music streamer in one box. For makers, developers, and audio enthusiasts, this build proves the Raspberry Pi 5 isn't just a hobbyist board — it's a versatile, high-performance machine ready for serious work and play.


